What to Do When iTunes Won’t Play MP3s
iTunes is a fantastic application for managing your digital music collection. When you import music from a CD or purchase songs from the iTunes Music Store, you know you are getting a file that is 100% compatible with iTunes. But there are many other places people get their music from: online stores like Amazon, friends’ MP3 collections, or file sharing services such as BitTorrent and newsgroups. On rare occasions, though, you may come across a file that iTunes cannot play, or even worse, fails to recognize. How can you get these files to work?
Playing MP3 Files that iTunes Can’t Play
There are three main reasons iTunes may not be able to see or play an MP3:
- The MP3 file is corrupt (meaning some of the data in the file is missing or is incorrect).
- The file says it is an MP3, but it is really another music format.
- The MP3′s ID tags (the data that tells iTunes artist/album/song info) is in an incompatible format.
Fixing Corrupt MP3 Files and Converting Other Formats
iTunes already does a very good job of playing MP3s that aren’t created perfectly. There are some encoding programs out there that have bugs in them and create files that are mostly readable. iTunes can read those. You may hear distorted sound when iTunes plays a bit of a track that is corrupt, but iTunes still gets through it. Unfortunately, there are some files that are so corrupt that they are simply unplayable in iTunes. While you may find other programs that are more forgiving than iTunes, if you want to get the MP3s into iTunes, you’re going to have to get them into a clean file. This is also true if the file identifies itself as an MP3 but is really another format.
Note that Mac OS X’s Finder will identify a file based on its extension. So, MySong.mp3 is listed as an MP3, where as MySong.m4a is listed as an AAC Audio File. iTunes does not rely on a file’s extension to determine how to play a file. So, even if you think a file has an incorrect extension, changing the extension is unlikely to make a difference — at least with iTunes.
If you have a corrupt MP3 or a file in an incorrect program, you can use the great (and free!) program called Max to convert the file. Max’s development has mostly been on hiatus over the last two years, but it has recently restarted. While the latest stable version is 0.9.1, I highly recommend you download the latest version listed in the Unstable section of the website. As of today, that’s R1438. It has better compatibility with Snow Leopard and newer versions of Mac OS X.
Once you have downloaded and opened Max, you need to first set up what kind of file you want Max to create for you. In this example, we’ll add the MP3 format. Just as a side note, Max is a bit of a pain to set up, but you only have to do this once, so hang in there:
- Open Max.
- Select Preferences from the Max menu.
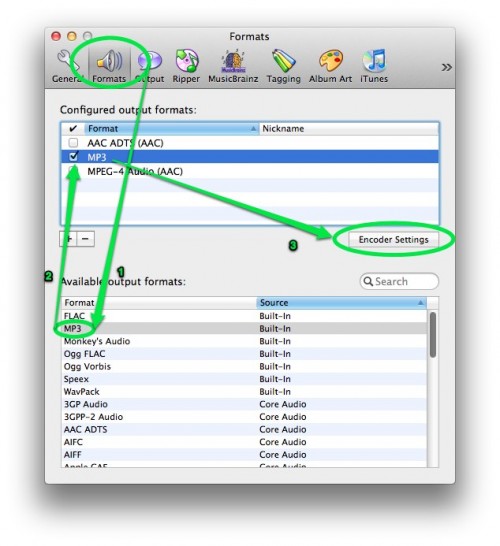
- Click the Formats tab.
- Check to see if MP3 is listed in the “Configured output formats” section. If it is, skip to step #7. Otherwise…
- Select MP3 from the “Available output formats” section and then press the plus button to add it.
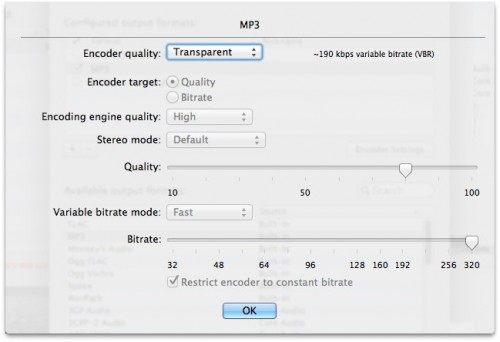
- The Encoder Settings window will open, allowing you to customize what quality level you want for your MP3. If you’re unsure, “Best” or “Transparent” are always safe options. Then click OK.
- Check the box next to MP3 so that Max will use this format, and then close the Preferences window.
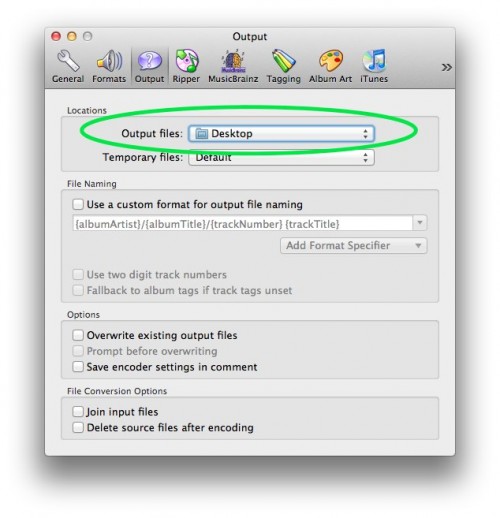
If your main Max window says “Output Directory not specified” in red at the bottom of the window, you may need to explicitly set an output directory for the converted file. To do this:
- Select Preferences from the Max menu.
- Select the Output tab.
- Under the “Output files” pop-up menu, select “Choose Directory” and then actually select a location for your new files.
- Close the Preferences window.
Now we’re actually going to convert the questionable file. You must be able to find this file’s location on your Mac. Then:
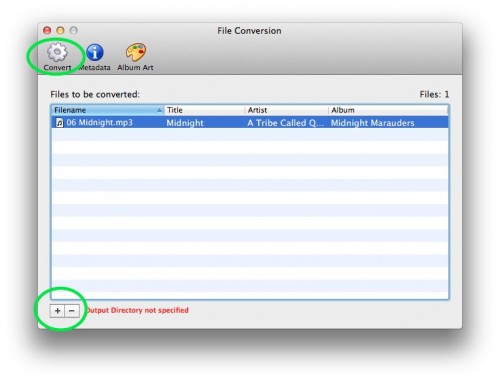
- Press the plus button in the lower left corner of the main window and find the file(s) you want to convert. Add them to this window.
- Press the Convert button in the upper left corner of the main window. Max will now attempt to convert your files. You’ll see a progress window, showing you what Max is doing. If it can convert your files, they’ll end up in the directory you specified. Otherwise, you should get an error from Max telling you it can’t convert the files.
Once the files have been converted, you can simply drag them to iTunes to see if iTunes can play them. That’s it! Of course, even if iTunes can “play” the file, that doesn’t mean it will sound right. Max does the best job it can converting corrupt files, but there’s no guarantee it’ll be perfect. If it’s still not what you want to hear, then you may have to get a new copy of the file from a better source.
Fixing an MP3′s ID3 tags
There’s another way iTunes will reject an MP3 you attempt to add to its library: the MP3 has incompatible ID3 tags. What are ID3 tags? They are the bits of the MP3 file that tell iTunes everything about the file: the artist name, album title, song title, what the album artwork looks like, etc. A few programs write ID3 tags that are incompatible with iTunes. When this happens, iTunes doesn’t know what to do with the file, even if the music portion is readable. The best way to handle this is to strip the file of all its ID3 tags and then rewrite the information in a compatible format. This is not too difficult but also requires a bit of setup.
The best application to do this task is MusicBrainz’s Picard. Once you have downloaded and opened the program, you will need to change some settings in the preferences:
- Open Picard.
- Select Preferences from the Picard menu.
- Select the “Tags” section of the Preferences window.
- Check these boxes in the “Tags” section: “Write tags to files,” “Clear existing tags,” “Remove APEv2 tags from MP3 files.”
- Uncheck this box: “Also include ID3v1 tags in the files.”
- Under “ID3v2 version,” select 2.3.
- Under “ID3v2 text encoding,” select “ISO-8859-1.”
- Finally, press OK.

Once you’ve done this, we’re ready to start working with the files. To write proper ID3 tags, perform the following steps:
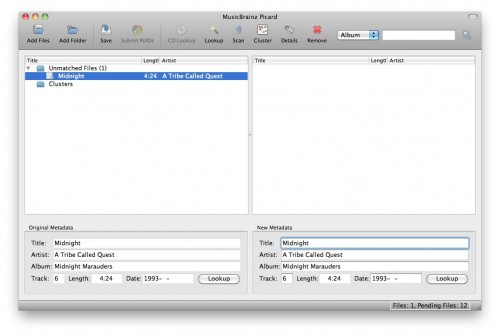
- Click Add Files in the main window. You can then navigate to the files in question and add them to the Picard window.
- Click on the first file you want to work on from the left side of the Picard window. Below the file, you can see the section called “Original metadata.” If there are any ID3 tags in the file, they will be displayed here.
- Next to the “Original metadata” section is the “New metadata” section. This is where you can type in any ID3 tags you want to identify the file. It can be exactly the same metadata as is on the left side. The key is that Picard will erase the corrupt metadata and replace it with metadata iTunes can read.
- Once you have typed new metadata (or not), you can press the Save button and have Picard finish the process.
- Finally, try adding the file to iTunes. If it works, then you know the ID3 tags were the problem. If iTunes still won’t add the file, the ID3 tags are not at fault.
That’s it! Did this guide help you? Have you found other ways to get iTunes to play nicely with troublesome MP3s? If so, add your thoughts to the comments section.